
IoT Prototyping Mobile App - MQTT Viewer w/ CloudMQTT
MQTT Viewer is a simple, configurable & ready to use internet of things (IoT) client. This app has been designed to help you get started with your IoT journey. Simply configure your MQTT server details, and start receiving events in the app immediately. Great for prototyping!

Learning Objectives
At the end of this post you will be able to:
- Configure MQTT Viewer with cloudmqtt.com
CloudMQTT Setup
Step 1: Register with CloudMQTT and login (they offer a Free plan as well).
Step 2: Click on Control Panel, this will take you to the dashboard.

Step 3: Create on + Create to create a new instance.
Step 4: On the instance setup screen, enter Name, select a Plan (free plan is available as well) and click on Create button.

Step 5: From Control Panel, click on Details button to open instance console.

Step 6: Instance console screen provides quite a few options to manage and view statistics of the MQTT instance.

Step 7: CloudMQTT requires clients to authenticate, so next you need to create a new user. Under Manage Users, enter username and password and click on Save to create a new user.


Step 7: Finally you need to provide required permissions to your newly created user. Under ACLs, select newly created user, enter the topic which this user can read/write and then check the Read Access? and Write Access? checkboxes.


Your CloudMQTT setup is complete and is ready to receive messages. You can test your instance by using Websocket UI provided in the console.
App Configurations
Step 1: Download MQTT Viewer from Play Store.
Step 2: Open MQTT Viewer and select Settings from the toolbar.
Step 3: In order to configure a new MQTT server, click on Server.
Step 4: Tap on the Host setting to edit. Enter m12.cloudmqtt.com and click Ok (make sure to copy this information from your CloudMQTT instance console).
Step 5: Tap on the Port setting to edit. Enter 14614 and click Ok (make sure to copy this information from your CloudMQTT instance console).
Step 6: Tap on the Topic setting to edit. Enter your topic name here, for this post we are using codifythings/mqtt and click Ok.
Step 7: Tap on the Device setting to edit. Enter your device name, for this post we are using androidClient and click Ok.
Step 8: CloudMQTT requires clients to authenticate, so tap on Enable Authentication.
Step 9: Tap on the Username setting to edit. Enter the username for the user that your created in the previous step and click Ok.
Step 10: CloudMQTT requires clients to authenticate. So tap on the Password setting to edit. Enter the password for the user that you created in the previous step and click Ok.
Leave QoS fields as-is. Your Server settings should look similar to the screenshot below.

Step 11: Click on the back button, and go to Message setting.
Step 12: If you are sending plain data, then leave the setting as-is i.e. do not enable JSON format and skip step 10. If you are publishing data to MQTT server in JSON format, then enable this setting and follow step 13.
Step 13: Tap on the Data Key setting to edit. You need to specify which field in the JSON message contains your data. For this tutorial, we are using moisture and click Ok. For example, if the message being published to MQTT server was {temperature: 45, moisture: 35}, then by specifying moisture in Data Key we are asking the app to use its value which in this case will be 35.
Your Message settings should look similar to the screenshot below.

Step 14: (Optional) Click on the back button and go to Notifications setting.
Step 15: (Optional) If you want the app to create a notification, then enable this setting.
As soon as you go back to the main screen, the app will connect to the new MQTT server settings (in the case of an error, a snack bar will be displayed with the error message). For this tutorial, we also configured the title, color theme, icon and data visualization, screenshot below shows the final product. If you want to change the color theme, icon or data visualization look at rest of the settings here.

Download
Disclaimer: This mobile app has only been designed for prototyping purposes, and is not production ready.
IoT Prototyping Mobile App - MQTT Viewer w/ DIoTY
MQTT Viewer is a simple, configurable & ready to use internet of things (IoT) client. This app has been designed to help you get started with your IoT journey. Simply configure your MQTT server details, and start receiving events in the app immediately. Great for prototyping!
Learning Objectives
At the end of this post you will be able to:
- Configure MQTT Viewer with dioty.co
DIoTY Setup
Step 1: Register with DIoTY and login (they offer a Free plan as well).
Step 2: Click on Get Started, this will take you to the dashboard with connection details.
Note: When you register, an email will be sent to you containing the password.

App Configurations
Step 1: Download MQTT Viewer from Play Store.
Step 2: Open MQTT Viewer and select Settings from the toolbar.
Step 3: In order to configure a new MQTT server, click on Server.
Step 4: Tap on the Host setting to edit. Enter mqtt.dioty.co and click Ok (make sure to copy this information from your DIoTY dashboard).
Step 5: Tap on the Port setting to edit. Enter 1883 and click Ok (make sure to copy this information from your DIoTY dashboard).
Step 6: Tap on the Topic setting to edit. Enter your topic name here, for this post we are using /codifythings@gmail.com/mqtt and click Ok.
Note: DIoTY requires that all your topic names start with /you-username/, for us, it was /codifythings@gmail.com/. This information is provided as part of connection details.
Step 7: Tap on the Device setting to edit. Enter your device name, for this post we are using androidClient and click Ok.
Step 8: DIoTY requires clients to authenticate. So tap on Enable Authentication.
Step 9: Tap on the Username setting to edit. Enter the username for the user that you created in the previous step and click Ok.
Step 10: Tap on the Password setting to edit. Enter the password for the user that you received in the email and click Ok.
Leave QoS fields as-is. Your Server settings should look similar to the screenshot below.

Step 11: Click on the back button, and go to Message setting.
Step 12: If you are sending plain data, then leave the setting as-is i.e. do not enable JSON format and skip step 10. If you are publishing data to MQTT server in JSON format, then enable this setting and follow step 13.
Step 13: Tap on the Data Key setting to edit. You need to specify which field in the JSON message contains your data. For this tutorial, we are using temperature and click Ok. For example, if the message being published to MQTT server was {temperature: 45, moisture: 35}, then by specifying temperature in Data Key we are asking the app to use its value which in this case will be 45.
Your Message settings should look similar to the screenshot below.

Step 13: (Optional) Click on the back button and go to Notifications setting.
Step 14: (Optional) If you want the app to create a notification, then enable this setting.
As soon as you go back to the main screen, the app will connect to the new MQTT server settings (in the case of an error, a snack bar will be displayed with the error message). For this tutorial, we also configured the title, color theme, icon and data visualization, screenshot below shows the final product. If you want to change the color theme, icon or data visualization look at rest of the settings here.

Download
Disclaimer: This mobile app has only been designed for prototyping purposes, and is not production ready.
IoT Prototyping Mobile App - MQTT Viewer w/ Mosquitto Server
MQTT Viewer is a simple, configurable & ready to use internet of things (IoT) client. This app has been designed to help you get started with your IoT journey. Simply configure your MQTT server details, and start receiving events in the app immediately. Great for prototyping!
Learning Objectives
At the end of this post you will be able to:
- Configure MQTT Viewer with test.mosquitto.org
Disclaimer: test.mosquitto.org is a publicly available instance of MQTT, so the data you publish might be available to others.
App Configurations
Step 1: Download MQTT Viewer from Play Store.
Step 2: Open MQTT Viewer and select Settings from the toolbar.
Step 3: In order to configure a new MQTT server, click on Server.
Step 4: Tap on the Host setting to edit. Enter test.mosquitto.org and click Ok.
Step 5: Tap on the Port setting to edit. Enter 1883 and click Ok.
Step 6: Tap on the Topic setting to edit. Enter your topic name here, for this post we are using codifythings/mqtt and click Ok.
Step 7: Tap on the Device setting to edit. Enter your device name, for this post we are using androidClient and click Ok.
Since this is a publicly available instance of MQTT so it does not require authentication. Leave Username, Password and QoS fields as-is. Your Server settings should look similar to the screenshot below.

Step 8: Click on the back button, and go to Message setting.
Step 9: If you are sending plain data, then leave the setting as-is i.e. do not enable JSON format and skip step 10. If you are publishing data to MQTT server in JSON format, then enable this setting and follow step 10.
Step 10: Tap on the Data Key setting to edit. You need to specify which field in the JSON message contains your data. For this tutorial, we are using light and click Ok. For example, if the message being published to MQTT server was {light: 25, temperature: 45}, then by specifying light in Data Key we are asking the app to use its value which in this case will be 25.
Your Message settings should look similar to the screenshot below.

Step 11: (Optional) Click on the back button and go to Notifications setting.
Step 12: (Optional) If you want the app to create a notification, then enable this setting.
As soon as you go back to the main screen, the app will connect to the new MQTT server settings (in the case of an error, a snack bar will be displayed with the error message). For this tutorial, we also configured the title, color theme, icon and data visualization, screenshot below shows the final product. If you want to change the color theme, icon or data visualization look at rest of the settings here.

Download
Disclaimer: This mobile app has only been designed for prototyping purposes, and is not production ready.
IoT Prototyping Mobile App - MQTT Viewer w/ HiveMQ
MQTT Viewer is a simple, configurable & ready to use internet of things (IoT) client. This app has been designed to help you get started with your IoT journey. Simply configure your MQTT server details, and start receiving events in the app immediately. Great for prototyping!
Learning Objectives
At the end of this post you will be able to:
- Configure MQTT Viewer with broker.hivemq.com
Disclaimer: broker.hivemq.com is a publicly available instance of MQTT, so the data you publish might be available to others.
App Configurations
Step 1: Download MQTT Viewer from Play Store.
Step 2: Open MQTT Viewer and select Settings from the toolbar.
Step 3: In order to configure a new MQTT server, click on Server.
Step 4: Tap on the Host setting to edit. Enter broker.hivemq.com and click Ok.
Step 5: Tap on the Port setting to edit. Enter 1883 and click Ok.
Step 6: Tap on the Topic setting to edit. Enter your topic name here, for this post we are using codifythings/mqtt and click Ok.
Step 7: Tap on the Device setting to edit. Enter your device name, for this post we are using androidClient and click Ok.
Since this is a publicly available instance of MQTT so it does not require authentication. Leave Username, Password and QoS fields as-is. Your Server settings should look similar to the screenshot below.

Step 8: Click on the back button, and go to Message setting.
Step 9: If you are sending plain data, then leave the setting as-is i.e. do not enable JSON format and skip step 10. If you are publishing data to MQTT server in JSON format, then enable this setting and follow step 10.
Step 10: Tap on the Data Key setting to edit. You need to specify which field in the JSON message contains your data. For this tutorial, we are using humidity and click Ok. For example, if the message being published to MQTT server was {temperature: 45, humidity: 35}, then by specifying humidity in Data Key we are asking the app to use its value which in this case will be 35.
Your Message settings should look similar to the screenshot below.

Step 11: (Optional) Click on the back button and go to Notifications setting.
Step 12: (Optional) If you want the app to create a notification, then enable this setting.
As soon as you go back to the main screen, the app will connect to the new MQTT server settings (in the case of an error, a snack bar will be displayed with the error message). For this tutorial, we also configured the title, color theme, icon and data visualization, screenshot below shows the final product. If you want to change the color theme, icon or data visualization look at rest of the settings here.

Download
Disclaimer: This mobile app has only been designed for prototyping purposes, and is not production ready.
IoT Prototyping Mobile App - MQTT Viewer w/ Eclipse IoT
MQTT Viewer is a simple, configurable & ready to use internet of things (IoT) client. This app has been designed to help you get started with your IoT journey. Simply configure your MQTT server details, and start receiving events in the app immediately. Great for prototyping!
Learning Objectives
At the end of this post you will be able to:
- Configure MQTT Viewer with iot.eclipse.org
Disclaimer: iot.eclipse.org is a publicly available instance of MQTT, so the data you publish might be available to others.
App Configurations
Step 1: Download MQTT Viewer from Play Store.
Step 2: Open MQTT Viewer and select Settings from the toolbar.
Step 3: In order to configure a new MQTT server, click on Server.
Step 4: Tap on the Host setting to edit. Enter iot.eclipse.org and click Ok.
Step 5: Tap on the Port setting to edit. Enter 1883 and click Ok.
Step 6: Tap on the Topic setting to edit. Enter your topic name here, for this post we are using codifythings/mqtt and click Ok.
Step 7: Tap on the Device setting to edit. Enter your device name, for this post we are using androidClient and click Ok.
Since this is a publicly available instance of MQTT so it does not require authentication. Leave Username, Password and QoS fields as-is. Your Server settings should look similar to the screenshot below.

Step 8: Click on the back button, and go to Message setting.
Step 9: If you are sending plain data, then leave the setting as-is i.e. do not enable JSON format and skip step 10. If you are publishing data to MQTT server in JSON format, then enable this setting and follow step 10.
Step 10: Tap on the Data Key setting to edit. You need to specify which field in the JSON message contains your data. For this tutorial, we are using temperature and click Ok. For example, if the message being published to MQTT server was {light: 25, temperature: 45}, then by specifying temperature in Data Key we are asking the app to use it's value which in this case will be 45.
Your Message settings should look similar to the screenshot below.

Step 11: (Optional) Click on the back button and go to Notifications setting.
Step 12: (Optional) If you want the app to create a notification, then enable this setting.
As soon as you go back to the main screen, the app will connect to the new MQTT server settings (in the case of an error, a snack bar will be displayed with the error message). For this tutorial, we also configured the title, color theme, icon and data visualization, screenshot below shows the final product. If you want to change the color theme, icon or data visualization look at rest of the settings here.

Download
Disclaimer: This mobile app has only been designed for prototyping purposes, and is not production ready.
IoT Prototyping Mobile App - MQTT Viewer
MQTT Viewer is a simple, configurable & ready to use internet of things (IoT) client. This app has been designed to help you get started with your IoT journey. Simply configure your MQTT server details, and start receiving events in the app immediately. Great for prototyping!
Features
- Simple & clean user interface
- Connects to different MQTT servers
- Supports username and password authentication
- Accepts both plain and JSON format messages
- Creates notifications when new messages arrive
- Allows to customize color theme
- Allows to choose any icon from Font Awesome and Weather Icons libraries
- Provides line chart and bar chart for data visualization


Settings
From the toolbar on the top right, select Settings.
General
This section contains following settings.
- App Name: Tap on the setting to edit. Enter app name that will be shown on top of the main screen and as the title for any notifications.
- Background Color: Tap on the setting to edit. Enter a color in hex format i.e. #FFFFFF. This setting will change the background color of the main screen.
- Foreground Color: Tap on the setting to edit. Enter a color in hex format i.e. #FFFFFF. This setting will change text color on the main screen.
- Highlighter Color: Tap on the setting to edit. Enter a color in hex format i.e. #FFFFFF. This setting will change the color for charts displayed on the main screen.
Server
This section contains following settings.
- Host: Tap on the setting to edit. Enter the hostname of MQTT server that you are connecting e.g. iot.eclipse.org.
- Port: Tap on the setting to edit. Enter the port number of MQTT server that you are connecting e.g. 1883.
- Username: Tap on the setting to edit. If MQTT server requires authentication, then enter provided username.
- Password: Tap on the setting to edit. If MQTT server requires authentication, then enter provided password.
- Topic: Tap on the setting to edit. Enter the topic name that the app will subscribe.
- Device: Tap on the setting to edit. Enter a device name, in some cases, MQTT servers require device name to be in a specific format, otherwise, this information shows up in MQTT logs when a client connects.
- QoS: Tap on the setting to edit. Select 0 or 1 for the quality of service.
Message
This section contains following settings.
- Enable JSON Format: App supports both plain and JSON formats. Tap on the setting to enable/disable.
- Data Key: Tap on the setting to edit. If JSON Format is enabled, then enter key of the field in JSON that contains sensor data e.g. {key: temperature value: 25}, enter the value in this field, and the app will automatically extract that information.
Notifications
This section contains following settings.
- Enable: App generates notifications when a new message arrives from MQTT server both plain and JSON formats. Tap on the setting to enable/disable.
Widgets
This section contains following settings.
- Show Icon: Tap on the setting to enable/disable if an icon should be shown on the main screen.
- Icon Library: If enabled, tap on the setting to edit. App currently supports Font Awesome and Weather Icons libraries. Select an icon library.
- Icon Type: If enabled, tap on the setting to edit. Enter font code available from respective library site (links provided below). Only enter the 4 digit code e.g. f00d, do not enter &#x before and ; after the code.
- Show Chart: Tap on the setting to enable/disable if a chart should be shown o the main screen.
- Chart Type: If enabled, tap on the setting to edit. Select chart type, currently only Line chart and Bar chart available. Only numeric messages are displayed on the chart, non-numeric messages are skipped from historical chart.
Disclaimer: This mobile app has only been designed for prototyping purposes, and is not production ready.

Getting Started with IBM® IoTF - #1: Data Publish
This article is the first in a series on IBM® Internet of Things Foundation (IoTF). It teaches you how to develop an Internet of Things (IoT) application in IBM® Bluemix.
In this tutorial, you are going to develop a simple Weather Monitoring IoT application. As the figure below shows, this IoT application will sense temperature and humidity data and publish it to IoTF using the MQTT protocol.
Learning Objectives
At the end of this tutorial you will be able to:
- Design an IoT device that senses temperature and humidity
- Create an IoT application and add services in Bluemix
- Setup device type and devices in IoTF
- Write code to publish device data to IoTF
- View device data in IoTF
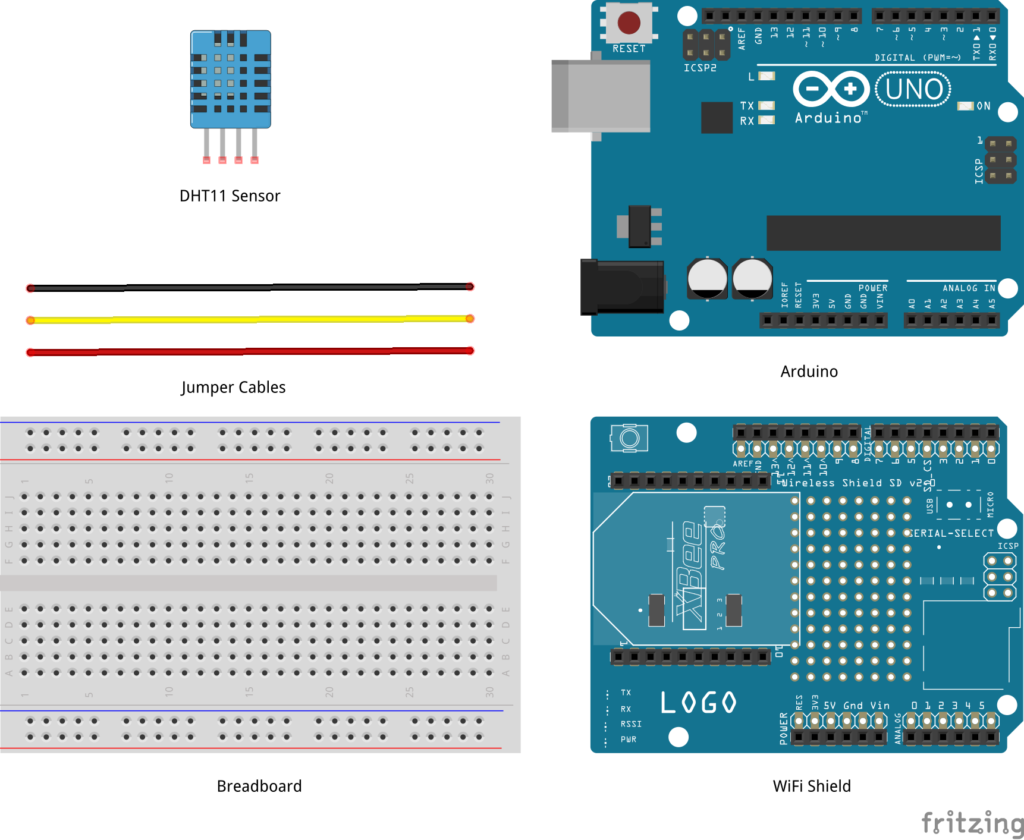
Hardware
Note: If the model of Arduino that you are using comes with built-in WiFi capabilities then you do not need a separate WiFi Shield.
- Arduino Uno
- Arduino WiFi Shield
- DHT11 (Humidity + Temperature Sensor)
- Jumper Cables
 Software
Circuit
Step 1: Make sure your Arduino is not connected to a power source.
Note: If the model of Arduino that you are using comes with built-in WiFi capabilities then you do not need a separate WiFi Shield and can skip this step.
Step 2: Attach WiFi Shield or Ethernet Shield on top of Arduino.
Step 3: Using jumper cables connect power (VNC) and ground (GND) ports on Arduino to power (+) and ground (-) ports on the breadboard.
Tip: It is a good practice to use red jumper cable for power (+ / VNC) and black jumper cable for ground (- / GND).
Step 4: Now that your breadboard has a power source, using jumper cables connect power (+) and ground (-) ports of your breadboard to power and ground ports of the DHT11 sensor.
Step 5: To read temperature and humidity values, you will need to connect a jumper cable from signal port of DHT11 sensor to D3 (Digital) port of your Arduino.
Your circuit is now complete and it should look similar to figures below.
 IBM IoTF Setup
Signup for Bluemix.
Login to Bluemix, you will be redirected to the Dashboard.
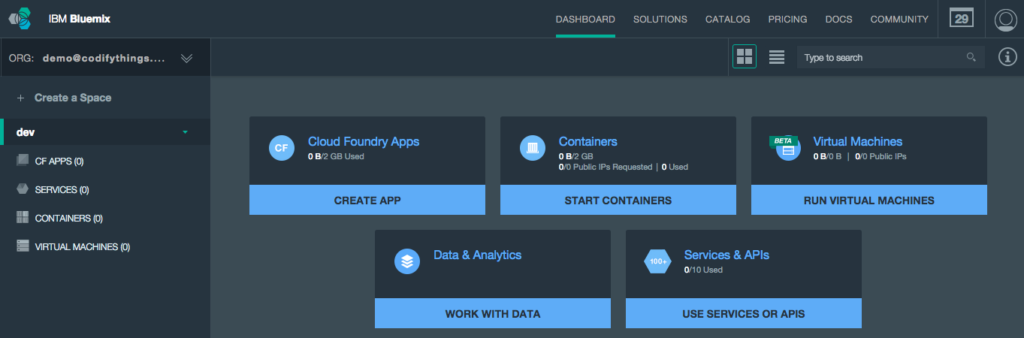 Select Catalog from the top menu.
![]()
Select Internet of Things Foundation Starter from Starters > Boilerplates.

Enter WeatherMonitoringSystem in the Name field (application name has to be unique across Bluemix). Click Create button.
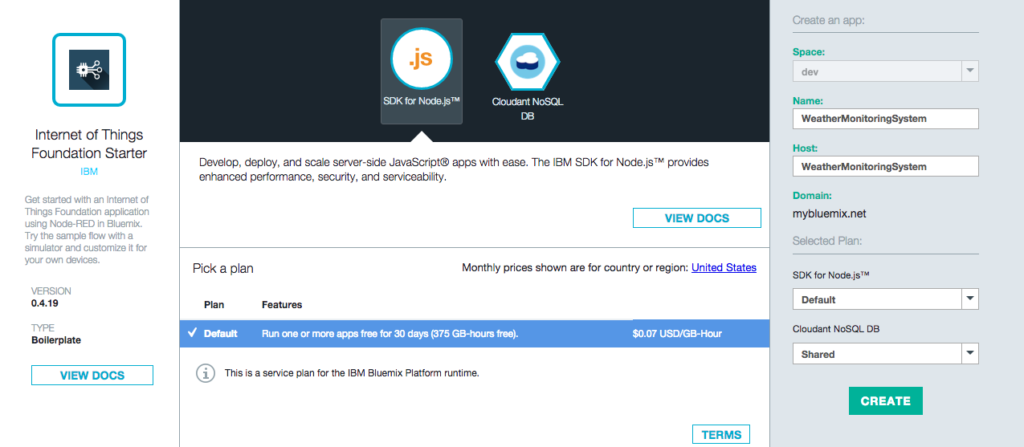
Bluemix will take some time to create your application. Once your application is ready it will be available at http://.mybluemix.net URL (in the case of this tutorial it will be http://WeatherMonitoringSystem.mybluemix.net).

To check if your application is running click on the link provided above. If an instance of Node-RED opens then your application was created as expected.
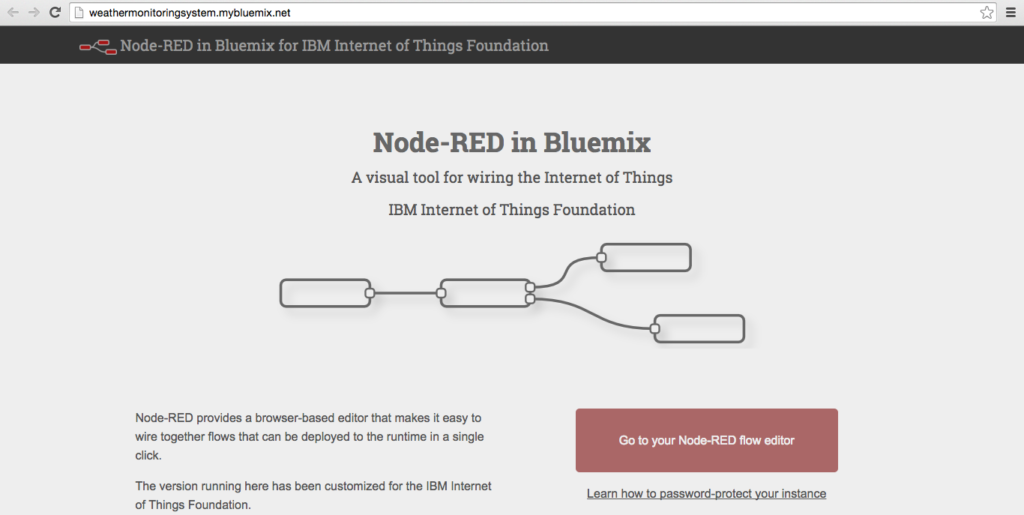
Application created using IoTF boilerplate uses Node.js as the runtime and by default includes a Cloudant NOSQL DB service and a Node-RED flow (this service will be used in upcoming tutorials).
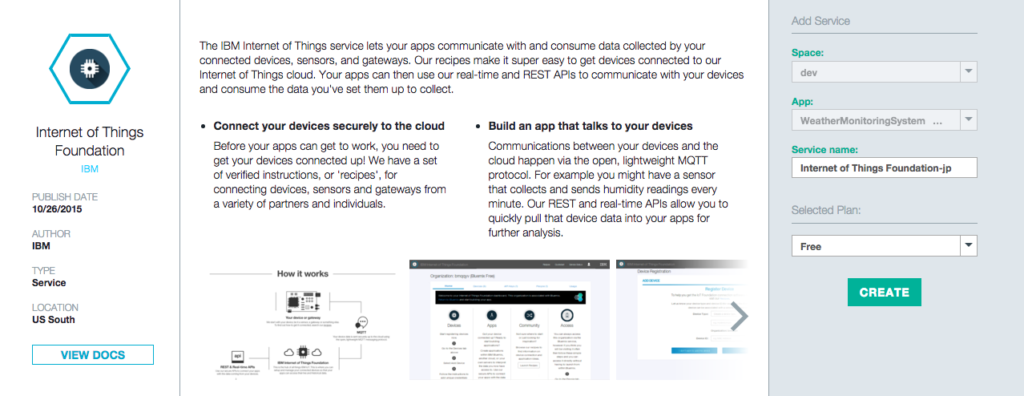
To register your devices with IoTF you need to add Internet of Things Foundation service to the app. From Dashboard open WeatherMonitoringSystem application, and click on + ADD A SERVICE OR API button. You will be redirected to Catalog. Under Services select Internet of Things and click on Internet of Things Foundation service.

On service properties screen, leave Service name and default plan Free as-is or change according to your requirements. Click on Create button. Bluemix will add this service to your app.
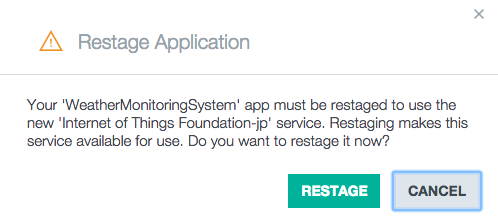
Bluemix will need to re-stage your application before it can be added to the app.
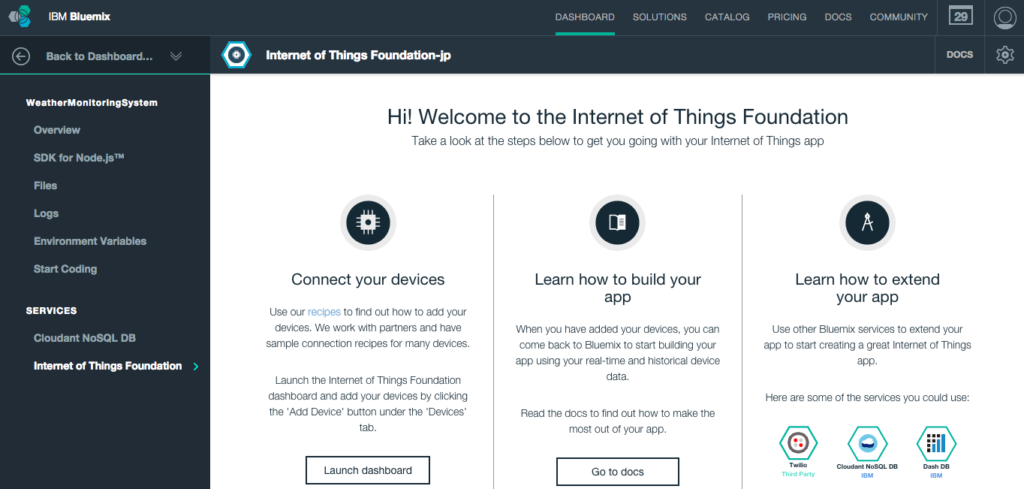
Once the previous step is complete, on your Dashboard you will be able to see newly added IoTF service in WeatherMonitoringSystem application. From Dashboard under Services section click on IoTF service to open details screen.

The service details screen provides you options to Launch dashboard, Go to docs and Find out how. Click on Launch dashboard to open IoTF dashboard.
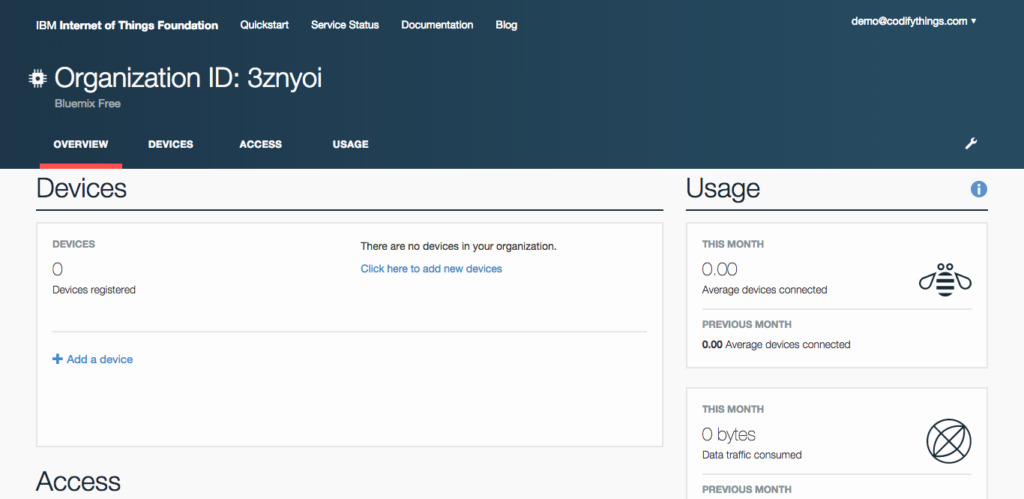
Overview tab provides you quick information about your Devices, Access, and Usage. Your device needs to be registered before it can start sending events to IoTF. Click on + Add a device link under Devices section.
If you have added devices previously then you can choose an existing Device Type otherwise you will need to create a new Device Type. Click on Create device type button.
Note: Device Type can be considered a template for devices i.e. all devices belonging to same Device Type will be initialized with same attributes.
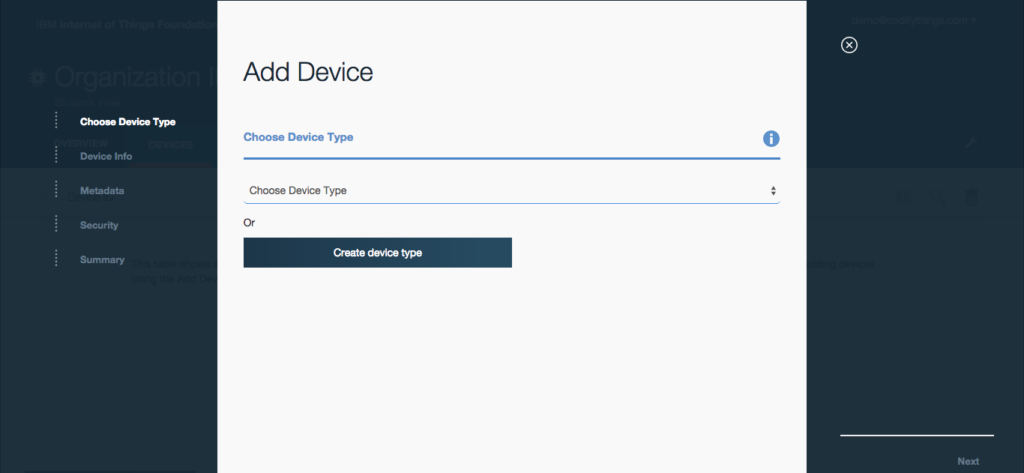
Select Create device type.
Enter Name and Description of the Device Type. Click Next to proceed.
Note: Later on in Arduino code, you will need to use this Name and depending on your version of MQTT client library that you are using to publish sensor data there might be a length limit, so check your client library for client name length limit.
Select Description from attributes list. Click on Next button.

Whichever Attribute you chose, on Submit Information screen you will need to provide values for them. Click Next.

Click Create button to complete Device Type setup.

You will be taken back to Add Device screen. Make sure you have selected the newly created Device Type from the list of values. Click Next.

On Device Info screen enter unique Device ID, and if you see Description is pre-filled with information that you entered while creating a new Device Type. Click Next.

Leave Metadata screen empty and click Next.

On Security screen, you have the option to either auto-generate a token or provide your own token. Leave Provide a token (optional) field empty and click Next button, this will make sure that a token is auto-generated.

Review your Device information on Summary screen and click Add button.

On next screen, the system will display auto-generated device token, make sure you copy and save the token as it will not be displayed again.

Your device setup is now complete and will be visible on the dashboard.

Arduino Code
IoTF is ready to receive events. Next, you are going to write Arduino code that will sense and publish events. Start your Arduino IDE and either type the code provided below or download it from GitHub. All the code goes into a single source file (*.ino) but in order to make it easy to understand and reuse, it has been divided into 5 sections.
- External Libraries: includes all libraries required to run the program
- - https://github.com/arduino/Arduino/tree/master/libraries/Ethernet
- - https://github.com/arduino/Arduino/tree/master/libraries/WiFi
- - http://playground.arduino.cc/main/DHT11Lib
- - https://github.com/knolleary/pubsubclient/releases/tag/v2.3
- Internet Connectivity Setup: code for WiFi connectivity, you simply need to replace
[code lang="js"]
char ssid[] = "<SSID_HERE>";
char pass[] = "<PASSWORD_HERE>";
[/code]
- Sensor Setup: code for reading sensor data
- Data Publish: code for publishing sensor data to IoTF, make sure to provide custom values in following fields
[code lang="js"]
char server[] = "<Organization_ID_HERE>.messaging.internetofthings.ibmcloud.com";
int port = 1883;
char topic[] = "iot-2/evt/<EVENT_NAME>/fmt/<EVENT_FORMAT>";
String clientName = String("d:<Organization_ID_HERE>:<Device_Type_HERE>:<Device_ID_HERE>");
char token[] = "<DEVICE_TOKEN>";
[/code]
- Standard Arduino Functions: implementation of standard Arduino functions setup() and loop()
[code lang="js"]
/***************************************************************************
* External Libraries
**************************************************************************/
#include <SPI.h>
#include <WiFi.h>
#include <dht11.h>
#include <PubSubClient.h>
/***************************************************************************
* Internet Connectivity Setup - Variables & Functions
**************************************************************************/
char ssid[] = "<SSID_HERE>"; // Network SSID (name)
char pass[] = "<PASSWORD_HERE>"; // Network Password (use for WPA,
// or use as key for WEP)
int keyIndex = 0; // Network Key Index Number
// (needed only for WEP)
int status = WL_IDLE_STATUS;
WiFiClient client;
void connectToInternet()
{
status = WiFi.status();
// Check for the presence of the shield
if (status == WL_NO_SHIELD)
{
Serial.println("[ERROR] WiFi Shield Not Present");
// Do nothing
while (true);
}
// Attempt to connect to WPA/WPA2 Wifi network
while ( status != WL_CONNECTED)
{
Serial.print("[INFO] Attempting Connection - WPA SSID: ");
Serial.println(ssid);
status = WiFi.begin(ssid, pass);
}
// Connection successful
Serial.print("[INFO] Connection Successful");
Serial.print("");
printConnectionInformation();
Serial.println("-----------------------------------------------");
Serial.println("");
}
void printConnectionInformation()
{
// Print Network SSID
Serial.print("[INFO] SSID: ");
Serial.println(WiFi.SSID());
// Print Router's MAC address
byte bssid[6];
WiFi.BSSID(bssid);
Serial.print("[INFO] BSSID: ");
Serial.print(bssid[5], HEX);
Serial.print(":");
Serial.print(bssid[4], HEX);
Serial.print(":");
Serial.print(bssid[3], HEX);
Serial.print(":");
Serial.print(bssid[2], HEX);
Serial.print(":");
Serial.print(bssid[1], HEX);
Serial.print(":");
Serial.println(bssid[0], HEX);
// Print received signal strength
long rssi = WiFi.RSSI();
Serial.print("[INFO] Signal Strength (RSSI): ");
Serial.println(rssi);
// Print encryption type
byte encryption = WiFi.encryptionType();
Serial.print("[INFO] Encryption Type: ");
Serial.println(encryption, HEX);
// Print WiFi Shield's IP address
IPAddress ip = WiFi.localIP();
Serial.print("[INFO] IP Address: ");
Serial.println(ip);
// Print MAC address
byte mac[6];
WiFi.macAddress(mac);
Serial.print("[INFO] MAC Address: ");
Serial.print(mac[5], HEX);
Serial.print(":");
Serial.print(mac[4], HEX);
Serial.print(":");
Serial.print(mac[3], HEX);
Serial.print(":");
Serial.print(mac[2], HEX);
Serial.print(":");
Serial.print(mac[1], HEX);
Serial.print(":");
Serial.println(mac[0], HEX);
}
/*****************************************************************************
* Sensor Setup - Variables & Functions
****************************************************************************/
dht11 DHT11;
#define DHT11PIN 3
float humidity = 0.0;
float tempC = 0.0;
void readSensorData()
{
int chk = DHT11.read(DHT11PIN);
Serial.print("[INFO] DHT11 Read: ");
switch (chk)
{
case DHTLIB_OK:
Serial.println("OK");
humidity = (float)DHT11.humidity;
tempC = (float)DHT11.temperature;
Serial.print("[INFO] Humidity (%): ");
Serial.print(humidity, 2);
Serial.print(" Temperature (*C): ");
Serial.println(tempC, 2);
break;
case DHTLIB_ERROR_CHECKSUM:
Serial.println("Checksum Error");
break;
case DHTLIB_ERROR_TIMEOUT:
Serial.println("Time Out Error");
break;
default:
Serial.println("Unknown Error");
break;
}
}
/***************************************************************************
* Data Publish - Variables & Functions
**************************************************************************/
// IP address of the IBM MQTT server
char server[] = "<Organization_ID_HERE>.messaging.internetofthings.ibmcloud.com";
int port = 1883;
char topic[] = "iot-2/evt/<EVENT_NAME>/fmt/<EVENT_FORMAT>";
String clientName = String("d:<Organization_ID_HERE>:<Device_Type_HERE>:<Device_ID_HERE>");
char token[] = "<DEVICE_TOKEN>";
PubSubClient pubSubClient(server, port, 0, client);
void publishData()
{
// Connect MQTT Broker
Serial.println("[INFO] Connecting to MQTT Broker");
char clientStr[60];
clientName.toCharArray(clientStr,60);
if (pubSubClient.connect(clientStr, "use-token-auth", token))
{
Serial.println("[INFO] Connection to MQTT Broker Successfull");
}
else
{
Serial.println("[INFO] Connection to MQTT Broker Failed");
}
// Publish to MQTT Topic
if (pubSubClient.connected())
{
//Read sensor data
readSensorData();
Serial.println("[INFO] Publishing to IBM IoTF");
String data = "{"d": {"humidity": "" + String(humidity) + "", "tempC": "" + String(tempC) + ""}}";
char jsonStr[50];
data.toCharArray(jsonStr,50);
Serial.print("[INFO] JSON Data: ");
Serial.println(jsonStr);
char topicStr[33];
String topicName = topic;
topicName.toCharArray(topicStr,33);
if (pubSubClient.publish(topicStr,jsonStr))
{
Serial.println("[INFO] Data Published Successfully");
}
else
{
Serial.println("[INFO] Failed to Publish Data");
}
Serial.println("[INFO] Disconnecting Server");
pubSubClient.disconnect();
}
Serial.println("[INFO] Publish to MQTT Broker Complete");
Serial.println("-----------------------------------------------");
pubSubClient.loop();
}
/***************************************************************************
* Standard Arduino Functions - setup(), loop()
**************************************************************************/
void setup()
{
// Initialize serial port
Serial.begin(9600);
// Connect Arduino to internet
connectToInternet();
}
void loop()
{
//readSensorData();
publishData();
delay(5000);
}
[/code]
Final Product
Make sure your Arduino is powered on and IoTF publish code has been deployed. As soon as the code has been deployed, open serial monitor.

Log in to IBM IoTF dashboard and open your device, the Recent Events section will list all the events with their JSON message.

Click on any Event to see payload.

Sensor Information section shows the latest value of each data point.
The Connection Log section will provide you information about the status of connection attempts from your device.
